Quickstart Guide#
This is a developers' guide for setting up Storyteller for native Android apps. This guide will cover the basic technical steps for initializing the Storyteller SDK, authenticating a user, and adding a StorytellerStoriesRowView to your app.
Resources#
Showcase examples#
- Compose — SDK init in
ShowcaseApp - Compose —
Storyteller.initializeinStorytellerServiceImpl - XML — SDK init in
ShowcaseApp - XML —
Storyteller.initializeinStorytellerServiceImpl
How to Add the SDK to Your Project#
Before you can add the Android SDK to your app, you will need to obtain an API Key. This is a secret key used to authenticate the SDK in your app. Throughout this document it will be marked as [APIKEY].
SDK Dependencies#
Choosing the SDK release line#
Android SDK 11.7.0 and 12.0.0 are separate release lines. SDK 12.0.0 follows 11.7.0 as a separate release for applications using Kotlin 2.1 or later and the newer Compose dependency line.
| Release line | Kotlin and Compose baseline | Minimum Android version for the core SDK |
|---|---|---|
11.7.0 |
Retains Kotlin 1.9 and Compose BOM 2024.12.01 |
Android 5.0 / API 21 |
12.0.0 |
Kotlin 2.1+ and Compose BOM 2026.06.01 |
Android 6.0 / API 23 |
Use 11.7.0 while your application remains on the existing dependency line. When adopting 12.0.0, update your application's Kotlin/Compose setup and minimum Android version together. Keep the core SDK and every optional Storyteller module on the same exact version; do not mix 11.7.0 and 12.0.0 artifacts.
Ad modules have additional requirements: ads24 requires Kotlin 2.1+ and API 23 even on the 11.x line, and adsnextgen requires API 24. See Choosing an Ad Module before selecting an ads integration.
Maven repository#
The Android SDK is published to Maven Central under the com.getstoryteller Maven group. New integrations must use Maven Central and must not add either legacy Storyteller Maven repository: CloudRepo or MyGet.
Migration notice: CloudRepo and MyGet, along with the legacy
Storyteller:*coordinates they serve, are deprecated. Both repositories will be sunset with the SDK12.0.0release. Existing integrations can use them temporarily while migrating, but must move to Maven Central before upgrading to12.0.0.
If you also use Google Ads, select exactly one of the version-aligned ads, ads24, or adsnextgen products. For true Clips IMA pre-roll, the optional version-aligned ads-ima artifact can be added alongside any one of those products and requires no separate host IMA dependency. See Choosing an Ad Module for Android, Kotlin, Google SDK, and migration requirements.
R8 / ProGuard#
If your app uses R8, the rules are added automatically.
SDK Installation#
The Android SDK can be included in your project using Gradle. It is recommended to use Android Studio. If you are having problems with configuring your build, check out the Android Studio guide or Gradle guides.
- Make sure Maven Central is available in the Project
build.gradlefile (MyAwesomeApp/build.gradle), under theallprojectssection
Note: make sure it is added to
allprojects, and notbuildscript
      ...
      allprojects {
         repositories {
            google()
            mavenCentral()
        }
      }
- Modify the app Module
build.gradlefile (MyAwesomeApp/app/build.gradle)
        ...
        dependencies {
            def storyteller_version = "<storyteller-version>"

            implementation(group: "com.getstoryteller", name: "sdk", version: "$storyteller_version")
        }
-
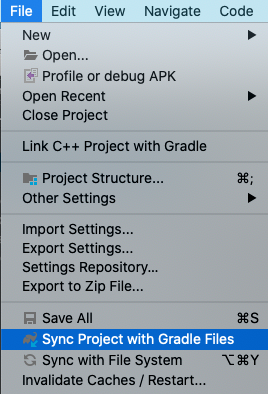
Sync your project with Gradle files
-
Android Studio
Migrating from the Legacy Storyteller Repository#
Older integrations may resolve Storyteller from either CloudRepo or MyGet. Maven Central coordinates are available from SDK 11.5.1, and both legacy repositories will be sunset with the SDK 12.0.0 release. To migrate an existing integration:
- Upgrade every Storyteller dependency to the same
11.5.1or later version. - Remove the CloudRepo or MyGet repository from your Gradle repositories.
- Replace the legacy
Storytellergroup withcom.getstorytellerwhile keeping each artifact name unchanged. For example, replaceStoryteller:sdkwithcom.getstoryteller:sdkandStoryteller:ads-vastwithcom.getstoryteller:ads-vast. - Sync Gradle and verify that the dependency graph contains only
com.getstorytellerStoryteller artifacts.
Do not mix Storyteller:* and com.getstoryteller:* coordinates in the same application.
SDK Initialization#
Before using the Android SDK in your app, you need to initialize it with an API key.
Adding an API Key#
Use the initialize(apiKey: String, userInput: StorytellerUserInput? = null, eventTrackingOptions: StorytellerEventTrackingOptions = StorytellerEventTrackingOptions(), onSuccess: () -> Unit = {}, onFailure: (StorytellerError) -> Unit = {}) public method to manually initialize the SDK at runtime. This will authenticate the SDK on the Storyteller API and configure it with the corresponding settings.
apiKey: (Required) the API key you wish to initialize the SDK withuserInput: details of the user to be authenticated (this should be a unique user ID. If this is not set, the default value is used)eventTrackingOptions: privacy and tracking configuration options (defaults to all tracking enabled)onSuccess: callback for successful completiononFailure: callback for failed completion with error
Usage:
    Storyteller.initialize(
      apiKey = "[APIKEY]",
      userInput = StorytellerUserInput("unique-user-id"),
      eventTrackingOptions = StorytellerEventTrackingOptions(
        enablePersonalization = true,
        enableStorytellerTracking = true
        // ... other options
      ),
      onSuccess = {
        // onSuccess action
      },
      onFailure = { error ->
        // onFailure action
      }
    )
Initialization errors:
InitializationError: when the context isnullInvalidAPIKeyError: when an invalid API key is usedNetworkError: when the call to load the settings for the SDK fails (i.e. a non-success HTTP status code is returned)NetworkTimeoutError: when the call to load the settings for the SDK times outJSONParseError: when a malformed settings response is received from the server
Note: Please be aware that this method is asynchronous
Authenticate a User#
For more information about Users and External IDs, please see Working with Users
Adding a StorytellerStoriesRow Composable#
- At first we will need a nesting composable. You can use any composable layout you want:
Box,Column,LazyColumn, etc.
   @Composable
   fun MainScreen() {
       Box() {
            // ...
       }
   }
- Storyteller Composables Now it's time to add the Storyteller Composables to your app. The Storyteller Composables are the building blocks of the Storyteller SDK.
     StorytellerStoriesRow(
       modifier = Modifier,
       dataModel = StorytellerStoriesDataModel(categories = emptyList()), // data model with the configuration for your Composables. We will describe how to use StorytellerDataModel below.
       delegate = listViewDelegate, // delegate for the Composables. We will describe how to use StorytellerListViewDelegate below.
       state = rememberStorytellerRowState() // state for the Composables. We will describe how to use StorytellerRowState below.
     )
XML Views (Legacy)#
Preferred way to add Storyteller Lists is to use Composables. Storyteller still supports XML/Views and the guide can be found in the StorytellerListViews documentation.
{"slug": "getting-started", "page_title": "Quickstart Guide", "page_url": "GettingStarted/", "canonical_url": "/android/GettingStarted/", "markdown": "# Quickstart Guide\n\nThis is a developers' guide for setting up Storyteller for native Android apps. This guide will cover the basic technical steps for initializing the Storyteller SDK, authenticating a user, and adding a `StorytellerStoriesRowView` to your app.\n\n## Resources\n\n- [Storyteller Showcase App](https://github.com/getstoryteller/storyteller-showcase-android/blob/main/README.md#L1)\n\n### Showcase examples\n\n- [Compose \u2014 SDK init in `ShowcaseApp`](https://github.com/getstoryteller/storyteller-showcase-android/blob/main/compose/main/src/main/java/com/getstoryteller/storytellershowcaseapp/ShowcaseApp.kt#L40)\n- [Compose \u2014 `Storyteller.initialize` in `StorytellerServiceImpl`](https://github.com/getstoryteller/storyteller-showcase-android/blob/main/compose/app/src/main/java/com/getstoryteller/storytellershowcaseapp/data/StorytellerServiceImpl.kt#L38)\n- [XML \u2014 SDK init in `ShowcaseApp`](https://github.com/getstoryteller/storyteller-showcase-android/blob/main/xml/app/src/main/java/com/getstoryteller/storytellershowcaseapp/ShowcaseApp.kt#L41)\n- [XML \u2014 `Storyteller.initialize` in `StorytellerServiceImpl`](https://github.com/getstoryteller/storyteller-showcase-android/blob/main/xml/app/src/main/java/com/getstoryteller/storytellershowcaseapp/data/StorytellerServiceImpl.kt#L43)\n\n## How to Add the SDK to Your Project\n\nBefore you can add the Android SDK to your app, you will need to obtain an API Key. This is a secret key used to authenticate the SDK in your app. Throughout this document it will be marked as `[APIKEY]`.\n\n### SDK Dependencies\n\n#### Choosing the SDK release line\n\nAndroid SDK `11.7.0` and `12.0.0` are separate release lines. SDK `12.0.0` follows `11.7.0` as a separate release for applications using Kotlin **2.1 or later** and the newer Compose dependency line.\n\n| Release line | Kotlin and Compose baseline | Minimum Android version for the core SDK |\n| --- | --- | --- |\n| `11.7.0` | Retains Kotlin 1.9 and Compose BOM `2024.12.01` | Android 5.0 / API 21 |\n| `12.0.0` | Kotlin 2.1+ and Compose BOM `2026.06.01` | Android 6.0 / API 23 |\n\nUse `11.7.0` while your application remains on the existing dependency line. When adopting `12.0.0`, update your application's Kotlin/Compose setup and minimum Android version together. Keep the core SDK and every optional Storyteller module on the **same exact version**; do not mix `11.7.0` and `12.0.0` artifacts.\n\nAd modules have additional requirements: `ads24` requires Kotlin 2.1+ and API 23 even on the 11.x line, and `adsnextgen` requires API 24. See [Choosing an Ad Module](Ads.md#choosing-an-ad-module) before selecting an ads integration.\n\n#### Maven repository\n\nThe Android SDK is published to Maven Central under the `com.getstoryteller` Maven group. New integrations must use Maven Central and must not add either legacy Storyteller Maven repository: CloudRepo or MyGet.\n\n> **Migration notice:** CloudRepo and MyGet, along with the legacy `Storyteller:*` coordinates they serve, are deprecated. Both repositories will be sunset with the SDK `12.0.0` release. Existing integrations can use them temporarily while migrating, but must move to Maven Central before upgrading to `12.0.0`.\n\nIf you also use Google Ads, select exactly one of the version-aligned `ads`, `ads24`, or `adsnextgen` products. For true Clips IMA pre-roll, the optional version-aligned `ads-ima` artifact can be added alongside any one of those products and requires no separate host IMA dependency. See [Choosing an Ad Module](Ads.md#choosing-an-ad-module) for Android, Kotlin, Google SDK, and migration requirements.\n\n### R8 / ProGuard\n\nIf your app uses R8, the rules are added automatically.\n\n### SDK Installation\n\nThe Android SDK can be included in your project using [Gradle](https://gradle.org/). It is recommended to use [Android Studio](https://developer.android.com/studio). If you are having problems with configuring your build, check out the [Android Studio guide](https://developer.android.com/studio/build) or [Gradle guides](https://gradle.org/guides/).\n\n1. Make sure Maven Central is available in the _Project_ `build.gradle` file (`MyAwesomeApp/build.gradle`), under the `allprojects` section\n\n > Note: make sure it is added to `allprojects`, and not `buildscript`\n\n```groovy\n ...\n allprojects {\n repositories {\n google()\n mavenCentral()\n }\n }\n```\n\n1. Modify the app _Module_ `build.gradle` file (`MyAwesomeApp/app/build.gradle`)\n\n```groovy\n ...\n dependencies {\n def storyteller_version = \"<storyteller-version>\"\n\n implementation(group: \"com.getstoryteller\", name: \"sdk\", version: \"$storyteller_version\")\n }\n\n```\n\n1. Sync your project with Gradle files\n\n- Android Studio\n\n \n\n### Migrating from the Legacy Storyteller Repository\n\nOlder integrations may resolve Storyteller from either CloudRepo or MyGet. Maven Central coordinates are available from SDK `11.5.1`, and both legacy repositories will be sunset with the SDK `12.0.0` release. To migrate an existing integration:\n\n1. Upgrade every Storyteller dependency to the same `11.5.1` or later version.\n1. Remove the CloudRepo or MyGet repository from your Gradle repositories.\n1. Replace the legacy `Storyteller` group with `com.getstoryteller` while keeping each artifact name unchanged. For example, replace `Storyteller:sdk` with `com.getstoryteller:sdk` and `Storyteller:ads-vast` with `com.getstoryteller:ads-vast`.\n1. Sync Gradle and verify that the dependency graph contains only `com.getstoryteller` Storyteller artifacts.\n\nDo not mix `Storyteller:*` and `com.getstoryteller:*` coordinates in the same application.\n\n## SDK Initialization\n\nBefore using the Android SDK in your app, you need to initialize it with an API key.\n\n### Adding an API Key\n\nUse the `initialize(apiKey: String, userInput: StorytellerUserInput? = null, eventTrackingOptions: StorytellerEventTrackingOptions = StorytellerEventTrackingOptions(), onSuccess: () -> Unit = {}, onFailure: (StorytellerError) -> Unit = {})` public method to manually initialize the SDK at runtime. This will authenticate the SDK on the Storyteller API and configure it with the corresponding settings.\n\n- `apiKey`: (**Required**) the API key you wish to initialize the SDK with\n- `userInput` : details of the user to be authenticated (this should be a unique user ID. If this is not set, the default value is used)\n- `eventTrackingOptions`: privacy and tracking configuration options (defaults to all tracking enabled)\n- `onSuccess`: callback for successful completion\n- `onFailure`: callback for failed completion with error\n\nUsage:\n\n```kotlin\n Storyteller.initialize(\n apiKey = \"[APIKEY]\",\n userInput = StorytellerUserInput(\"unique-user-id\"),\n eventTrackingOptions = StorytellerEventTrackingOptions(\n enablePersonalization = true,\n enableStorytellerTracking = true\n // ... other options\n ),\n onSuccess = {\n // onSuccess action\n },\n onFailure = { error ->\n // onFailure action\n }\n )\n```\n\nInitialization errors:\n\n- `InitializationError`: when the context is `null`\n- `InvalidAPIKeyError`: when an invalid API key is used\n- `NetworkError`: when the call to load the settings for the SDK fails (i.e. a non-success HTTP status code is returned)\n- `NetworkTimeoutError`: when the call to load the settings for the SDK times out\n- `JSONParseError`: when a malformed settings response is received from the server\n\n> Note: Please be aware that this method is asynchronous\n\n## Authenticate a User\n\nFor more information about Users and External IDs, please see [Working with Users](Users.md)\n\n## Adding a StorytellerStoriesRow Composable\n\n1. At first we will need a nesting composable. You can use any composable layout you want: `Box`, `Column`, `LazyColumn`, etc.\n\n```kotlin\n @Composable\n fun MainScreen() {\n Box() {\n // ...\n }\n }\n```\n\n1. Storyteller Composables\n Now it's time to add the Storyteller Composables to your app. The Storyteller Composables are the building blocks of the Storyteller SDK.\n\n```kotlin\n StorytellerStoriesRow(\n modifier = Modifier,\n dataModel = StorytellerStoriesDataModel(categories = emptyList()), // data model with the configuration for your Composables. We will describe how to use StorytellerDataModel below.\n delegate = listViewDelegate, // delegate for the Composables. We will describe how to use StorytellerListViewDelegate below.\n state = rememberStorytellerRowState() // state for the Composables. We will describe how to use StorytellerRowState below.\n )\n```\n\n## XML Views (Legacy)\n\nPreferred way to add Storyteller Lists is to use Composables. Storyteller still supports XML/Views and the guide can be found [in the StorytellerListViews documentation](StorytellerListViews.md).\n", "copy_markdown_include_header": false, "base_path": "android", "ai_dir": "ai", "missing_payload_behavior": "empty"}